29 May 2017

ANOTHER MAD PROJECT

HI ALL!

Last week i was wandering like a zombie between tons of miniatures in my local GW shop when suddenly an orc smiled at me... :)


So i decided to buy an ork...
...
...ehm...
...
...a box of orks...
...
mmmmhhhh a whole 1000pt army of orks and begin a new adventure in Age of sigmar :)


...


...

I could not wait so i immediately started to paint the warchanter...

My idea is to make swamp bases so, for greater contrast, i want to paint orcs with bright colors


That's my actual WIP... (i really love orks...)


Tonight i'll finish him.. STAY TUNED! :)


21 April 2017

-STEP BY STEP- Astra Militarum Command Chimera Pt.2


HI ALL!

In the previous post (Astra Militarum Command Chimera Pt.1) i've shown how i converted the tank...

Now i  want to show you a brief step-by-step on how i've painted it ๐Ÿ˜


Obviously, i primed with Citadel Chaos Black.
I prefer priming my nimiatures with black primer because it helps with shadows...


Then i've painted base colors, with a oblique camo pattern, and i've painted all details using masking tape where needed...


At this point is very important to protect the whole model with transparent glossy because it helps with decals and weathering (as described in this post)...

After deployed all decals, the chimera is ready for weathering...
PS: Remember to seal the whole model again before weathering! ๐Ÿ˜‰


Now we're ready to whash the model with oil paints...
I prefer oil paints over standard washes because you have more "control" and they fill the recesses much better and because they dry very slowly, you can add or remove color easily...


 (I'll explain how to use oil paints on future post ๐Ÿ˜‰)


Now the step i love.... WEATHERING!!!!

In the GRIM DARK FUTURE of 40K there are destroyed cities, radiations, acid rains etc etc... so i love to represent the erosion of those environments over the vehicles...

Before start with weatering i searched for images of radiations erosion...


So i took from the drawer my "magic rust kit" ๐Ÿ˜‚...


...and i started with heavy rust and with sponge weathering tecnique...


After the weathering process was finished, i sealed the whole model with Vallejo Matt Varnish, i've painted the tank commander and that's the final result! ๐Ÿ˜


I hope you enjoyed this brief tutorial and don't hesitate to ask me info on "how to do"

See you soon!!!!!! ๐Ÿ˜‰


14 April 2017

-STEP BY STEP- Astra Militarum Command Chimera Pt.1


Hi all!!!

Today i want to show you how i've built and painted my Astra Militarum (... ehm... IMPERIAL GUARD ๐Ÿ˜’ ) command chimera

While i was searching for some ideas, i've noticed that someone has built his chimera with the turret on the back........


When i saw those pictures, the "miniature conversion engine" has started to work :D

LET'S GO!


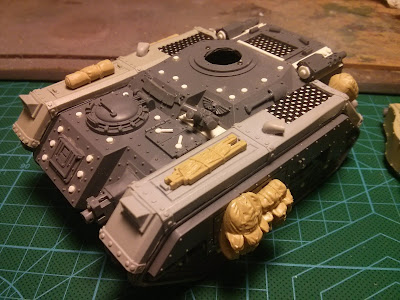
I first sawn the top hull in two parts in order to move back the hole of the turret then i glued some sprue pieces to reinforce the structure and i've glued the two parts together, adding some plasticard to close the holes...


...then i made two holes to magnetize the turret and i added the engine grid using a personal computer dust filter...


PS: I used the Panzer Turret from KROMLECH


I added an autocannon and some others details and i drilled the hatch to make room for tank commander...


Then i've built the rest of the model like a normal chimera and when the main hull was completed i added track guards from Forgeworld...


I added some rivets (made with plasticard and a leather piercer) and some bags and accessories from Tamiya U.S. MILITARY EQUIPMENT SET


And that's the final result.... ๐Ÿ˜€


At last i've decided to remove the Dozer blade... ehehe

I hope you enjoyed and that will serve for some ideas ๐Ÿ˜

See you soon for Pt.2 PAINTING !!!


Related Posts Plugin for WordPress, Blogger...